
Figures are not difficult to paint if you simplify the shape of a person into something we all recognise and can draw. Using a simple shape like a carrot, painting people into a landscape scene is easy. Paul Cezanne, the famous French impressionist, who first discovered the value of carrots in learning to draw and paint said, ‘The day is coming when a single carrot freshly observed will cause a revolution’.
On a piece of paper practice, with your rigger, drawing the outline shape of a carrot. Now fill it in. Paint a few carrots.
Next put a dot on top of some carrots - not too big, and leaving a small gap to represent the neck. Paint tiny darker carrots on the remaining carrot bodies, and what have we got ? Men and women!
If you spend half an hour painting carrot people you will find they start to grow arms and legs. What’s happening is you are starting to improvise and sketch, and the more you practice the better you will get at painting people.
Tuesday, 15 January 2008
Watercolour Painting - Painting People

Drawing Notes - Negative and Positive Spaces

Your ability to draw is greatly enhanced when you know how to identify positive and negative spaces, visually measure distances, and apply the resulting information to your drawings.
This lesson illustrates and demonstrates the process of breaking down subjects into positive and negative spaces, and sketching their shapes within a drawing space. The four parts are:
- Seeing lines between spaces
- Containing spaces in a drawing space
- From seeing spaces to sketching shapes
- Examining the final stages of a drawing.
Contour lines are formed when edges of spaces and/or objects meet. Contour lines can outline a complete object as well as its individual parts.
A contour drawing comprised of lines that follow the contours of the edges of various components of a subject and define the outline of its shapes.
Shapes are the outward contours or outlines of objects. Basic shapes include circles, ovals, squares or rectangles.
Positive space is the space in a drawing that is occupied by an object and/or its various parts.
Negative space refers to the background around and/or behind an object or another space.
Proportion refers to the relationship in size of one component of a drawing to another or others.
A drawing space (also called the drawing surface or a drawing format), refers to the area in which you render a drawing within a specific perimeter.
You can use the overall shape of your subject (and its parts) as a contour drawing in two steps:
- Study the subject until you can identify the subject’s positive space. Everything else is then considered negative space.
- Examine the shapes and sizes of the positive and negative spaces and how they fit together to identify the locations of the contour lines.
Sunday, 13 January 2008
Drawing Notes - Basic Techniques - Introduction
Most objects that we are likely to want to draw can be visually simplified into three basic shapes: cube, cone and sphere (plus any combination of these shapes).
Training yourself to see these shapes contained within your subjects makes it considerably easier for you to start to draw them, so it is worth practising. In addition, the whole idea of translating three-dimensional objects onto a two-dimensional surface can become easier by practising shading, looking carefully at where the highlights are on an object and at the corresponding shadows.
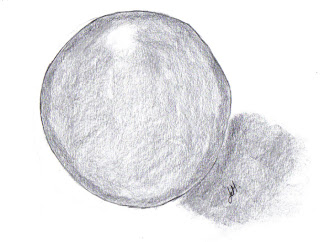
Spheres form the basis of many vegetables, such as onions and oranges, as well as vases, ornaments and even fish paraphernalia. The highlight here is usually circular and can normally be seen towards the top, where the natural light is reflected.

 The cube is the basis for objects as diverse as matchboxes, radios and garden sheds - only the scale differs. Unlike the two curved objects, a cube has clearly defined shading, usually light on top, medium tone on one side and a darker tone on the other visible side.
Studying light is also a valuable activity. Whilst writers and philosophers spend much time simply thinking, so artists spend much time just looking. The key is to mentally absorb what you see and be prepared to apply this to situations where you have to rely on your visual memory due to lack of appropriate lighting.
Finally, once you have mastered the skill of visualizing everyday objects as being constructed from individual spheres, cones and cubes, start to seek combinations to develop your own personal ‘toolbox’.
From Cone to Flowerpot
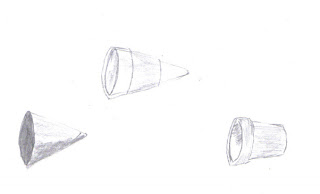
A cone can become the base shape for many objects, in this case, a flowerpot. Try to ensure that there are no points on the base: a smooth, unbroken line should curve round at the places where the straight lines meet in.
Next, start to construct the shape of the object that you wish to develop into a drawing around the base shape.
The base shape has now served its purpose and can be removed, leaving the ‘moulded’ shape of the flowerpot looking three-dimensional and thoroughly convincing.
Thursday, 3 January 2008
Watercolour Painting - Mountain Landscape
 Our first painting only uses one tube of paint so we don’t have to worry about mixing colours. We learn about tone too – mixing in more or less water to create lighter or darker shades of colour. Read the steps through before you start.
You will need:
- Paint: Burnt Umber
- Brushes: Large (1 ½ inch) brush and no.3 rigger.
- Paper: a sheet of 10 x 14 inch 140lb/300gsm watercolour paper.
- Palette
- Water pot
- Mop-up cloths
- Pencil
- Ruler
- Eraser
- Board 16 x 20 inch to stick your paper on
- Masking tape
2. Sky – Wet the large brush. Starting from the top of the page, use broad strokes to wet down to an inch above the horizon line. (Look from the side to see the sheen and make sure it is wet.)
3. Quickly mix watery Burnt Umber. Paint the sky starting from the top. Leave some gaps of white cloud. Mix more paint with less water to apply another darker layer of sky. Use horizontal dabs to form sausage shapes – large ones at the top, small below. Dry this.
4. Middleground – Reload your brush with paint. Keep above the horizon line and paint a wobbly ‘M’ for your mountains. Fill this in and let it dry. (I’m left handed so I start from the right. If it is easier, start from the left.)
5. Mix some darker paint (use less water). Dab in the lake shore, holding the brush upright like a chisel. Leave some white bits but don’t go below the horizon line. Dab some even darker paint along the horizon line to finish the lake edge.
6. Foreground – Making sure your painting is dry, let’s paint the lake. Make a weak mixture of paint (use lots of water) and load the large brush well. Start from one side and make a broad stroke across to the other side. Leave some white between the shore and water’s edge. Sweep across again, and repeat the action to fill the foreground with water.
7. When the lake is dry you can paint the rushes. Dry your large brush on your cloth, and then load it with almost neat paint. Using short downward strokes, form small patches of rushes. You can vary the shade of the paint slightly by adding a little water to give lighter patches here and there, but keep the brush quite dry so that the bristles splay to create the stalks of the rushes.
8. To finish off, paint in one, three or five little birds (even numbers never work right on the eye for some reason) with the rigger brush - it’s simple, just a tiny ‘V’ stroke or tick to show the wings in flight. Then sign your painting off (personally I use a pencil but a pen or paint is fine too).
Congratulations! You’ve just created your first masterpiece.
Wednesday, 2 January 2008
Drawing Notes - Materials - Watercolour
Although watercolour is a medium more usually associated with painting, it can easily be used in a way that allows it to fit into the category of drawing. The key difference is that for drawing purposes, watercolour is used primarily to compliment linear illustrations, rather than using its pure colour to create an image.
To draw with watercolour paints you will need a couple of soft watercolour brushes (usually sable or squirrel hair) and a suitable watercolour paper that needs to be strong and preferably slightly textured, cartridge paper is perfectly acceptable, however.
Try It Yourself
Using only a paint brush and two colours – one light and one dark – draw a yellow tennis ball without the use of outlines.
Step by Step Exercise
- After creating the shapes by line drawing with a B pencil, wash the basic colours onto them.
- Next, mix a neutral yet warm grey from ultramarine, violet and a touch of orange, and use this to wash around the shapes of the shadows, creating a sense of curvature on all three objects.
- The final drawing relies heavily on the effects of colour, while still emphasizing the individual shapes and the linear structure of the detail.

Drawing Notes - Materials - Pen and Ink
You can draw with any type of pen you choose – a ballpoint or fountain pen can be used effectively – but there are two types that are particularly well suited to drawing for the following reasons.
Most ‘fineline’ or permanent ink pens are designed for artists, and produce sharp, fine lines that do not run or bleed, no matter what you do with them. Using these pens can produce fine line drawings that require no more treatment; alternatively you can dilute some Indian ink and add tone to a line drawing by washing this onto your picture using a soft brush.
The other type is the fibre-tip pen (often used for writing). The ink in these pens often is not permanent, which gives you the opportunity to wash across a line drawing with plain water to create subtle bleeds and tones.
Try It Yourself
Draw a pair of bananas using a fibre-tip pen, recording all the shapes in line. Then use a wet, soft brush to create the shading, starting at the bottom and working up towards the light.
Step by Step Exercise
- Record the curved shapes of the group of objects using waterproof ink.
- Using a very dilute ink, select the darkest areas of the group and wash this on, starting at the bottom and pulling up towards the light areas.
- The key to this tonal drawing is not so much the variety of tones achieved by subtle dilution of the ink, but more the highlights that were left alone. You always need highlights in any drawing, and if they can reflect the texture of your objects, so much the better.

Drawing Notes - Materials - Watersoluble Pencils
Water-soluble pencils are remarkably versatile, as they can not only be used as normal pencils for either line drawing or shading, but they can also be washed across with a wet, soft brush to create a watercolour effect.
Water-soluble coloured pencils contain solid sticks of coloured pigment that can be dissolved with water, making them valuable, multipurpose drawing tools.
Water-soluble graphite pencils work to the same principle, except when washed across they produce tones of grey instead of colour. Both types of pencils have great potential and are certainly worth experimenting with.
Try It Yourself
Take an orange and two water-soluble coloured pencils – orange and purple. Draw the outline of the fruit with the orange and block in the colour using the edge. Lightly shade the base with purple and wash over the colour, working from the light top to the darker base.
Step by Step Exercise
- First block in the shapes with appropriate colours; don’t worry too much about tone at this stage.
- Next, choose a warm colour such as purple or violet to draw on to the previous stage to create the shadows and darker tones. Then wash across the shapes with a wet brush.
- The final stage illustrates the characteristics of water-soluble pencils – bright, strong colours and a fluid watercolour feel, yet with the solidity of a pencil drawing.

Tuesday, 11 December 2007
Drawing Notes - Materials - Coloured Pencils
Coloured pencils have the great advantages of being highly portable and inexpensive. They come in a wide variety of colours and can really make a drawing come alive. They can also be blended easily, allowing you to create an amazing range of tones, and usually have good covering power.
Try It Yourself
Take a single fruit, and draw it with coloured pencils. Use only two pencils to create three different tones – dark, middle and light.  Step by Step Exercise
- The first stage is to block in the main colours – don’t worry about creating tones at this stage.
- Next, use violet to draw on top of the colours, recording the shapes of the shadows.
- Create the three-dimensional look of this picture by leaving highlights at the top of the objects and applying darker shading to the bottom


Monday, 10 December 2007
Drawing Notes - Materials - Pencils
The pencil is probably the implement that most people associate with the term ‘drawing’ – and not unreasonably, as it is a clean, easily accessible implement that can be found easily anywhere.
Pencils are divided into two categories, H (hard) and B (soft), which are then further divided by number – 9B being extremely soft and 2B being fairly soft. Artists rarely have much use for H-grade pencils.
Combining Marks
Pencils are particularly useful for creating softly shaded shapes that also require line drawing on top to create detail.
Try It Yourself
Draw the outline of an egg using a B pencil. Then, using the edge of a 2B pencil, shade the egg, easing off the pressure towards the centre, where it will appear lighter.
Step by Step Exercise
- To make the line drawing of the basic shapes of a group of objects, use the sharpened tip of a B pencil.
- Next, add the main tones by drawing onto the shapes using the edge of a 4B pencil, working in a circular motion.
- Complete the final pencil drawing by adding the deepest and darkest shadows with a very soft 6B pencil.

Friday, 19 October 2007
Watercolour Painting - Using Brushes
The Flat Brush (Hake)
Lets start with the workhorse brush, the large 1 1/2 inch hake.
It is large, holds lots of water and that needs to be controlled.
- Start by dipping the brush in the water. Then rest the brush on the rags keeping the tip of the materials clear of the cloth.This way the excess water is taken from the body of the brush and the tips stay wet. Never dry the tips unless you are packing up for the day. Repeat every time you rinse your brush so you control the amount of water in your paint mix. This little routine is important and well worth practicing a few times before starting to paint. With a little practice it will become an automatic habit.
- Using the corner of the brush tip take up some paint and in the centre of the palette, keep the brush flat, and move from left to right. This blends the paint with the water held in the brush. It also takes up the blended paint on the brush ready to apply to the paper.
- To mix colours together, the method is as in step 2, just repeat the process with a second, or even third, colour and blend with the first. Turning the brush over and repeating the side to side movement gives an even loading of mixed paint.
The smaller flat brush (hake) is used in the same way as the larger one.
A final point on hakes - NEVER bend the bristles down on the palette, it is a sure fire way of damaging the brush.
Using a Rigger
- The no3 rigger is a very small fine brush. it can be held and used like a pen, dipping into water and then paint and mixing on the palette. This is done with the same sideways movement used with a hake. When using a rigger the paint mix should have a similar consistency as ink
- As it is so small it will come as no great surprise that the rigger does not hold a lot of water so it may take several dips into the water jar. Use plenty of water as it is all to easy to clog the bristles with lumps of paint. A useful check to see if your paint is mixed, if there are solid lumps of paint on the hairs of your rigger then you need to be using more water.
Thursday, 18 October 2007
Watercolour Painting - Building a Picture
OK this applies to all mediums really, whatever the subject or style the basic formula to begin with is the same. That eliminates that dreaded 'how do I start?' feeling. Looking at those first blank sheets of paper can be quite daunting, still can be for me after years of practice.
So lets start by breaking down a picture into four components.
- Horizon
- sky
- middle ground
- foreground
Tuesday, 16 October 2007
Watercolour Painting - Getting it Together
So you want to paint, now lets get equipped to produce your first masterpiece. Before you put your Nikes on and dash of to buy out your local art shop you need to have a list of what you need, saves a lot of time and a hell of a lot more money.
Paints
Watercolours come in tubes and pans. Pans are hard little tablets of paint which need to be softened with water, and lightweight and easy to transport about. Tubes are ready to use so less hassle so good to begin with.
There are many different paint manufacturers of both student and artist quality paints. To begin with student quality is cheaper so finding your painting preferences is less of a hard push on your wallet. The easy way to tell the difference is the stars on the tubes. Like hotels the more stars the more you can expect from your paint. So which of the manufacturers is best? Again it is personal preference and well worth varying the brand till you find the one that suits your painting. I work in Dahler Rowney and sometimes even now trial other paints but DR suits me so I come back to it.
So now colours, oh wow there is so many. Keep your palette simple is a golden rule. Choose 8 or 9 paints and work with them. My 9 palette consists of:
- Ultramarine Blue
- Burnt Umber
- Alizarin Crimson
- Cobalt Blue Hue
- Lemon Yellow
- Light Red
- Raw Sienna
- Payne's Grey
- Hooker's Green Dark
Two major NOT DOs at this point.
- Don't buy a huge great box of every colour available, you'll never use them.
- Don't buy bargain bucket paint, they don't mix properly even separate on the paper which is frustrating to say the least.
Again be minimal, you don't need a roll of a hundred brushes, 3 will do fine and cover everything. So the brush list:
- Large one and half inch hake/flat brush. This is the watercolourists workhorse. Goat hair is preferable but synthetic will do.
- Small three-quarter inch hake/flat brush. Idea for smaller areas. Goat hair is again preferable but synthetic is fine.
- No 3 rigger. This the detail work brush. Fine lines, curves even a signature.
Always use watercolour paper. So they types of paper available are:
- Hot Pressed Paper - Very smooth surface, ideal for illustrative work.
- Cold Pressed (Not) Paper - a medium grained surface and is the most used and easiest to find.
- Rough Paper - A very rough surface paper.
Other Kit
- White plate, tray or palette.
- Large jar, pot for water
- Cloths or old rags to wipe brushes
- Pencil, HB is fine
- Ruler
- Putty eraser
- flat board larger than your paper all round.
- Masking Tape
- Masking fluid
- Hair dryer (OK not essential but useful for speeding up drying)
Monday, 15 October 2007
Watercolour Painting - Some Basics - Watercolour, a History?
Watercolour has come in and out of fashion many times. The paint is made from natural pigments mixed with a water-soluble gum that acts as a binder. It was believed watercolour painting began in England at the start of the 1700s. Now its known the Egyptians used a form of watercolour, over 3000 years ago, Irish monks used it to illustrate the Book of Kells and other manuscripts between 600-800AD. Oils are considered more durable so watercolour fell out of fashion with artists and became an artist's sketching aid. Those sketches would later possibly become the oil paintings which now sit in the world's galleries. Then in the 1700s watercolour came back into its own when a studio, opened by Dr Thomas Munro, for young aspiring watercolourists releases a William Turner on to the world. Turner's work is legendary the world over and still the inspiration to many watercolourists.
Sunday, 14 October 2007
Watercolour Painting - Some Basics - Why Use Watercolour Paints?
Watercolour is said to be the most difficult of all the painting mediums to use, personally I feel the opposite. Watercolour has so many benefits that its just simply the easiest start to painting.
Watercolours are:
- easy to blend and mix
- easy to use and apply
- dry quickly so no hanging around endlessly to start the next bit
- relatively inexpensive to buy enough to get started. All art materials are expensive.
- good value as a little paint goes a long way
- cleaner to use as watercolours wash out of clothing and rags
- non-toxic so safe to use with youngsters about
- easy and lightweight to carry
- can be done anywhere, any time

